37 — Build Your Home Security Lab
Level: Intermediate · Time: ~25 min · Prerequisites: Lesson 36 — Forensics, IR and Cloud Tools
Why this matters
Everything up to here has been description; a lab is where description becomes skill. You run the scan, read the log, write the rule, and watch your own attack produce your own alert — and at that moment the subject stops being theory you have opinions about. It is also the only place where offensive technique is unambiguously legal: you own the machines, you own the network, and there is nobody to ask. If you do one practical thing in this entire course, build the lab, because having executed an attack and having read about one are not the same knowledge. It is also what you will describe in an interview: not "I studied detection engineering", but "I built an isolated range, ran a simulated attack, found the gap and wrote the rule".
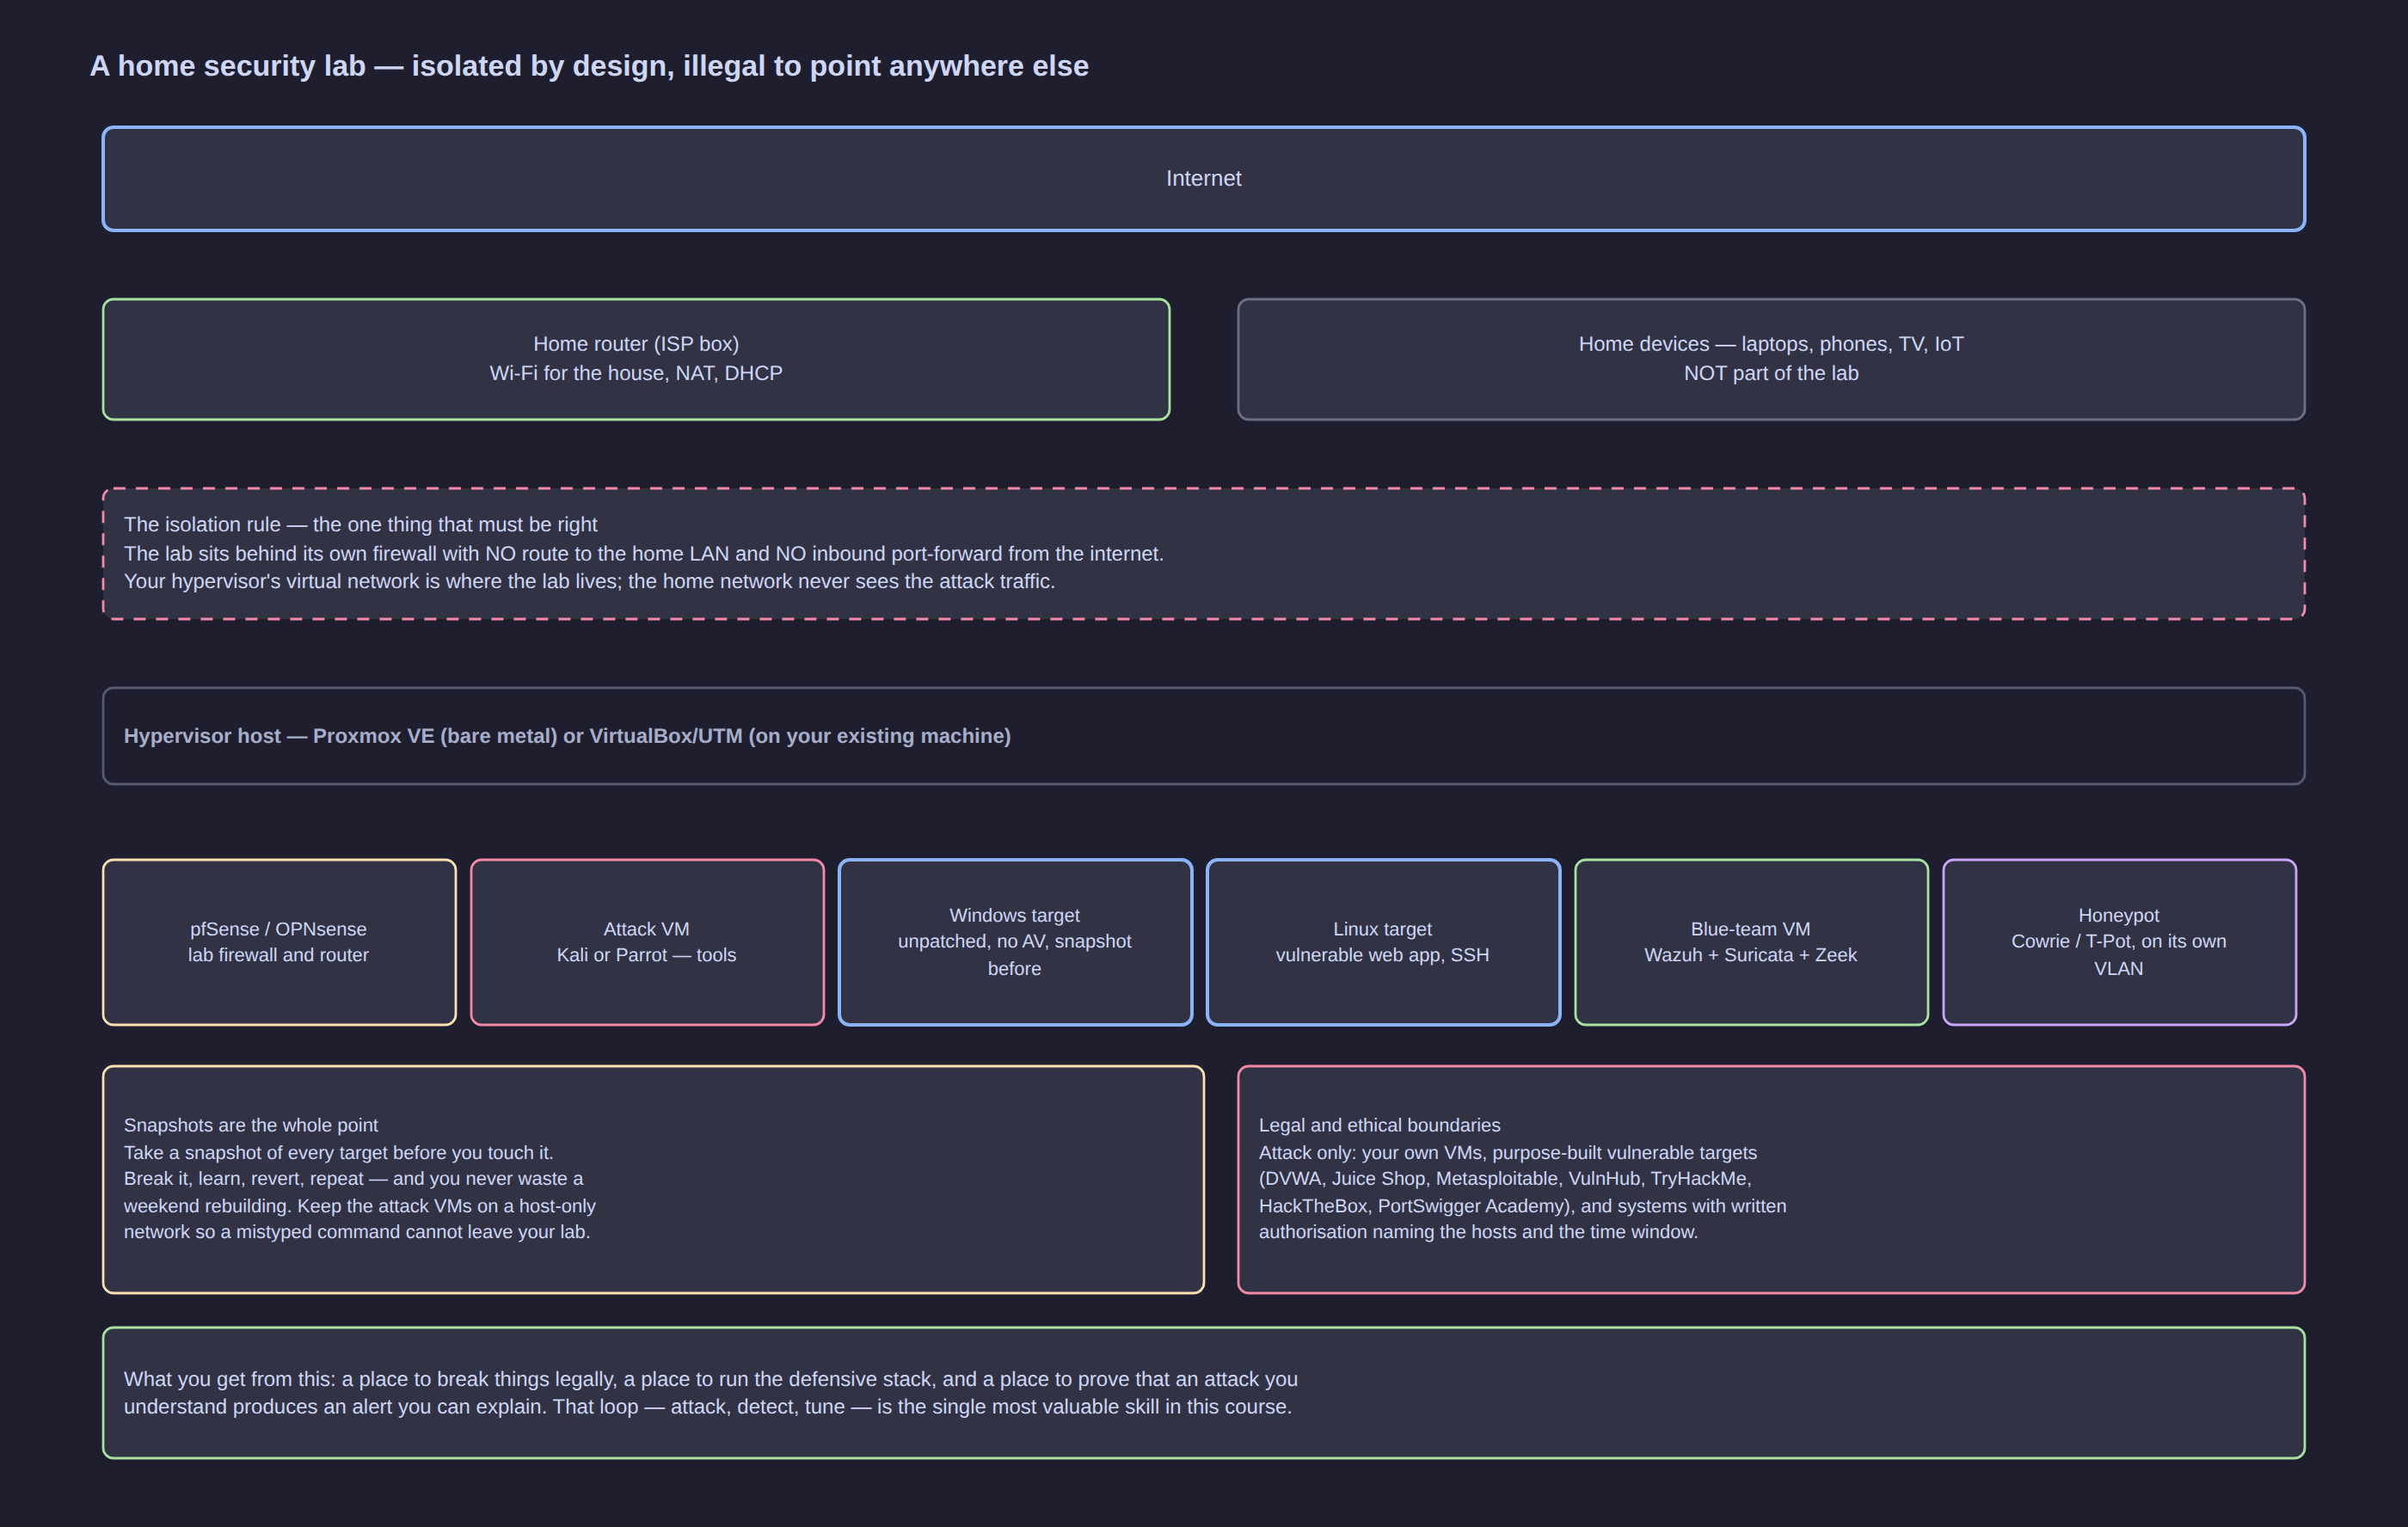
Click the diagram to open it full size.
The mental model: three jobs and nothing else
A lab is not a collection of virtual machines. It is a small environment with a specific purpose, and if it cannot do these three things it is a hobby, not a lab.
| The job | What it looks like when you have it | How you know it works |
|---|---|---|
| Practise offensive technique legally | an attack VM and targets that exist to be broken, on a network that cannot reach anything real | you can scan, exploit and pivot with no doubt about permission |
| Run a real defensive stack | host agents, network sensors, a manager that stores and alerts, a dashboard | an event from a target arrives in an interface you can search |
| Prove cause and effect | one technique, one alert: you know why it fired and which log line did it | you can explain the alert to another person without guessing |
The third job is the one people skip, and it is the only one that produces a skill an employer pays for. Collecting logs is installation work; explaining an alert is analysis.
[!IMPORTANT] The course rule applies without exception, in every lesson from here on: only your own lab, only targets built to be attacked, and written authorisation for anything else. Scanning or attacking a network you do not own is a criminal offence in most countries even when you damage nothing and even when your intention was to help.
Hardware and platform: the honest trade-offs
Two workable starting points. Neither is wrong, and the right answer depends on how much you will actually use it.
| Hypervisor on the machine you own | Dedicated bare-metal hypervisor | |
|---|---|---|
| Examples | VirtualBox, UTM (Apple silicon), VMware Workstation/Fusion | Proxmox VE, XCP-ng |
| Hardware | the laptop or desktop you already have | a used mini-PC, small form factor office machine or second-hand server |
| Memory | 8 GB gets you started, 16 GB is comfortable | 32 GB or more once a full blue-team stack runs beside the targets |
| Strengths | free, no new hardware, portable, instant | always on, real routing and bridging, snapshots as a workflow, sensors see real traffic |
| Honest costs | you share RAM with your own work; the machine sleeps when you close the lid | one-off hardware cost (tens to a few hundred euros used), fan noise, electricity, and a machine to keep patched |
Memory is the binding constraint, not CPU. Rough allocation for a working range: one attack VM at 2–4 GB, each target at 1–4 GB, a blue-team VM running the manager and dashboard at 4–8 GB, plus a firewall VM at 1 GB. That is why 8 GB gives you an attack VM and one target, and why a full defensive stack wants 32 GB. Disk matters almost as much: budget for the guest images plus snapshots, and use an SSD.
Check CPU virtualisation support before anything else — hardware-assisted virtualisation is enabled in firmware and, on Linux, visible with lscpu or by confirming the kvm modules are loaded. Then check it is turned on in the firmware settings. Doing this after you have downloaded three images is wasted time.
Network design — where beginners create real danger
The choice of virtual network mode decides whether your lab is a sealed range or a foothold inside your own house. Learn these three properly.
| Mode | The VM can reach | Can reach the VM | Danger |
|---|---|---|---|
| Host-only / internal | the host and other VMs on that virtual network | the host and other VMs on that virtual network | none, if vehicles do not also sit on a real segment |
| NAT | the internet, through the host | nothing from outside, usually not the home LAN either | the lab can reach out; useful for updates only |
| Bridged | your home network, with the same access as your laptop | everything on your home network | the whole point of this section: this is where a lab becomes a liability |
A bridged VM is not contained at all. It gets an address from your home router, it can see your NAS, your printer and your partner's laptop, and anything you install with a vulnerable service is now a vulnerable service on your home network. Beginners choose bridged because it is the default-looking option and it "just works" — which is exactly the problem.
The correct pattern is a lab firewall:
   internet
      │
 [ home router ]──────────── home LAN (laptops, NAS, phones, printer)
      │                                │
      │                        [ management URL only ]
      │
 [ host or mini-PC running the hypervisor ]
      │
   ├─ NIC 1 ── pfSense / OPNsense "WAN"  (faces the home LAN)
   └─ NIC 2 ── pfSense / OPNsense "LAN"  =  isolated virtual switch
                    │
        attack VM · Windows target · Linux target · blue-team VM · honeypot
How to build the isolated switch on each platform:
- Proxmox VE — create a Linux bridge with no physical port attached, so nothing on it can leave the box. In the host network configuration that is a
vmbr1stanza withbridge-ports none,address 10.10.10.1/24,bridge-stp off,bridge-fd 0, then attach every lab VM's network device tovmbr1and nothing else. - VirtualBox — the host-only network created in the network manager is the isolated switch; give it a subnet nothing else uses, and set every lab VM's adapter to that network. Attach the firewall VM's second adapter to it.
- UTM — a host-only network mode provides the same result on Apple silicon; the emulated networks are for the rare guest that needs a different CPU architecture.
Then let the lab firewall own the lab:
- Give the firewall VM two interfaces — one on the virtual switch, one facing the home LAN or NAT.
- Change the default lab LAN subnet. Firewall distributions commonly default to an address range that also exists on home routers, and a collision produces very confusing symptoms. Pick something you will remember, such as a
10.10.10.0/24lab LAN. - Turn on the DHCP server on the lab interface and turn DHCP off everywhere else, so no lab VM ever asks your home router for an address.
- Write an explicit block from the lab LAN to the home LAN subnet, and to any other private range, in the firewall rule set — and log it, because the log is how you will discover a misconfiguration.
- Add no port forwards, no UPnP, no remote-management exposure from the internet. If a lab VM can be reached from outside your house, the design is wrong.
The build sequence, in order
Do not start installing targets before step 4, or you will rebuild the network around them.
- Install the hypervisor. VirtualBox or UTM on the machine you have, or Proxmox VE / XCP-ng on the dedicated box. Confirm virtualisation support, then patch the host.
- Create the isolated virtual switch as described above and note its name — you will select it for every VM.
- Install the firewall VM (pfSense CE or OPNsense), assign its two interfaces, and confirm the web interface answers on the home-facing side only.
- Configure the lab LAN: subnet, DHCP scope, address reservation for each VM you plan, and the explicit deny rules toward the home network. Test the deny by trying to ping your home router's LAN address from the firewall.
- Snapshot the firewall once it is configured and working. Do this before the first target, not after.
- Build the attack VM (Kali Linux or Parrot Security OS) on the virtual switch, and confirm it has internet access only through whatever route you deliberately allowed.
- Build the targets: the Windows target from evaluation media with no antivirus and no updates, the Linux target with a deliberately vulnerable application installed on it, and the blue-team VM. Put the honeypot on its own segment if you add one.
- Snapshot every fresh target before it is touched, with a name that says so —
clean-before-first-use. Then confirm, from the attack VM, that the lab network has an address range with no route to your house.
The VM inventory and where legal targets come from
| VM | Role | Notes |
|---|---|---|
| Attack VM | Kali Linux or Parrot Security OS with the offensive tool set | the tools from Lessons 29, 30 and 33 live here |
| Windows target | evaluation image, no antivirus, unpatched on purpose | snapshot before first use; it exists to be compromised |
| Linux target | web server with a deliberately vulnerable application installed by you | the standard way to practise Lesson 10's material |
| Blue-team VM | the manager, sensors, dashboard and rule set from Lessons 31–35 | the SIEM, IDS and network metadata components |
| Honeypot (optional) | anything that should never be touched | on its own segment, and it alerts on every interaction |
Where legal targets come from, in the categories worth knowing:
- Deliberately vulnerable web applications you install yourself — Damn Vulnerable Web Application (DVWA), OWASP Juice Shop, and the deliberately insecure projects published for training. Install them on the Linux target with
docker run --rm -p 3000:3000 bkimminich/juice-shop, or by following the project's own setup instructions. - Published vulnerable machine images built for training — the well-known deliberately broken distributions and the community image libraries of vulnerable machines, which exist so that people can practise legally.
- Hosted training platforms with their own legal ranges — the subscription and free-tier platforms that give you an isolated network and explicit permission to attack it. Useful when you have no hardware at all.
What you must never do is point these tools at something you do not own. "It was only a scan" is not a defence, and neither is "I was trying to warn them".
Snapshots, sustainability and the hard rules
The workflow that keeps a lab alive is a two-minute habit, not a project:
# Proxmox VE
qm listsnapshot 100
qm snapshot 100 clean-before-first-use --description "post-install, unpatched by design"
qm rollback 100 clean-before-first-use

# VirtualBox
VBoxManage snapshot "win-target" take clean-before-first-use
VBoxManage snapshot "win-target" restore clean-before-first-use
The rule: snapshot before you touch a target, break it, learn from it, revert, repeat. Never skip the revert to "finish later" — a target you have already compromised is a target whose logs you no longer trust, and rebuilding from scratch is what turns a lab into an abandoned weekend project.
Your first exercise, once the range is up:
ip -br a                        # confirm which interface is on the lab LAN
ip route                        # confirm there is no route to the home LAN
nmap -sn 10.10.10.0/24          # discover your own lab hosts
nmap -sV 10.10.10.20            # identify services on your own target
Then go to the blue-team VM and find that scan in the interface: the same events, from the other side. That round trip is the whole purpose of the lab, and it is exactly what Lesson 38 builds on.
Safety and legal rules, as a hard list:
- Only your own lab VMs. Never a system you do not own, including one that "looks abandoned" or is owned by a friend who said "sure, go ahead" verbally.
- Anything outside the lab needs written, scoped authorisation that names the systems, the window and the contact. Otherwise there is nothing to do.
- Your internet service provider's terms may constrain scanning activity even from your own connection; check before you run anything that reaches the internet.
- Never let a lab VM appear on the internet. No port forwards, no UPnP, no exposing the attack VM to "test it properly".
- Use throwaway credentials inside the lab. Never reuse a real password, and never carry real data into a target VM.
- Keep the lab off the network your household depends on. If someone else's work stops when you break the lab, the design failed.
Weekend checklist — what "done" looks like:
- End of day one: hypervisor installed and patched; isolated switch created; firewall VM answering on its management interface; lab LAN with DHCP; deny rule from lab to home LAN tested and logged; first snapshot taken.
- End of day two: attack VM and both targets built and snapshotted; blue-team VM installed; a ping and a port scan from the attack VM visible in the defence interface.
- Then, every session: snapshot, work, record what you observed, revert.
Attack it / Defend it
| The attack | How it works | The control that stops it |
|---|---|---|
| A bridged attack VM on the home LAN | the VM takes an address from the home router and sees every household device | put lab VMs on the isolated virtual switch only; never mix bridged and lab adapters |
| A vulnerable target reachable from the house | a service you installed for practice is now an exposed service on a real network | lab firewall with an explicit deny to the home subnet, plus DHCP served only on the lab side |
| A lab port forward from the internet | a rule added "temporarily" to demonstrate remote access | no forwards, no UPnP, and a periodic review of the router's forward list |
| Rogue DHCP on the lab segment | a second DHCP server hands out addresses and gateway settings | one DHCP authority — the lab firewall — and a static address for the firewall itself |
| Compromised target reused for the next exercise | the VM carries the attacker's artefacts and your logs no longer mean anything | revert to the clean snapshot before every session |
| A real credential reused in the lab | a password that matters ends up in a VM you are deliberately breaking | lab-only throwaway credentials, no real data in the range |
| Running a forced test against the wrong host | a copy-pasted exploit or test script aimed at an address that is not the target | written scope, one target at a time, and verifying the address before running anything |
| Lab leaking traffic into the home network | the attack VM resolves and contacts real hosts because the route exists | the deny rule plus the firewall log, which is the evidence the rule works |
Key takeaways
- A lab exists for three jobs — practise legally, run a real defensive stack, and prove that a technique you understand produces an alert you can explain. A range that only collects logs teaches nothing.
- Memory and network design decide everything. 8 GB starts you off, 16 GB is comfortable, 32 GB or more for a full stack; and a bridged VM is on your home network, not in a lab.
- The firewall VM is the centrepiece. Two interfaces, a lab-only switch, its own DHCP, and an explicit deny toward the home network, tested and logged.
- Snapshots are the practice, not a feature. Snapshot, break, learn, revert — the cost of rebuilding is what kills labs.
- Legality is not about intent. Own the target, or hold written scoped authorisation, or do not run the tool.
Check yourself
- Name the three jobs a lab must do, and say which telemetry source you would check to prove the second one works.
- Your attack VM is bridged to the home network instead of on a host-only network. Name two concrete risks, one to your household and one to your practice.
- Why does the lab firewall serve DHCP on the lab segment, and what symptom would you see if a second DHCP server appeared on it?
- You have reverted a target to its clean snapshot. What two things should you confirm before the next exercise — and why does the revert matter to the value of your logs?
- A friend asks you to run your new scanning and exploitation practice against their company's external address "to show what a real attack looks like". What is the correct answer, and what would make it acceptable?